This information is specific to small classrooms with a HuddleCam all in one webcam. Equipment may vary in these rooms as they are not set up in the standard fashion. Visit the Classroom Tech page, if you are unsure which category your room fits in.
Small Classroom with HuddleCam Tech Highlights
Review the information and FAQs below to see what type of equipment is available in these rooms.
Camera |
Whiteboard Options |
Live Stream |
Recording |
|---|---|---|---|
|
|
|
|
Classroom Tech FAQs
Note for users of screen readers: letters in parentheses in the instructions below refer to corresponding areas on example images. If you have any questions about these instructions, contact Learning Technologies for assistance.
Recording
-
How to start and stop recording
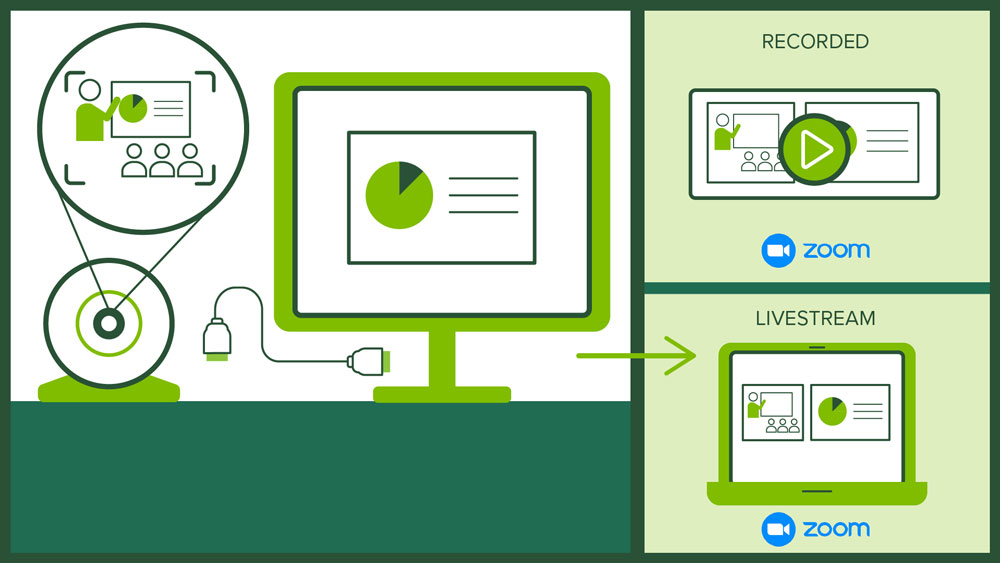
This room is not equipped with a lecture capture device but has a HuddleCam all-in-one Webcam that can be used in a Zoom meeting. To capture (record) your lecture, bring your laptop, plug the HuddleCam into your computer, start a Zoom meeting, and record the meeting to the cloud.
-
What is recorded in Zoom recording video?
The Zoom recording contains the audio and video captured by the HuddleCam webcam in addition to any content you choose to share through Zoom such as your screen.
-
How do I make sure I am heard?
The microphone is on top of the HuddleCam webcam and is omni-directional, meaning it can pick up audio coming from all directions. Make sure you are close to the HuddleCam so that your audio is picked up.
-
How do I see and share lecture capture or Zoom recording videos?
Zoom meetings that are recorded to the cloud are automatically uploaded to the instructors My Media (Kaltura) account. The video is private to that instructor until action is taken to embed/publish to a Canvas course.
-
How do I enable Harmonize Brainstorm with ChatGPT to create discussion prompts?
On the topic edit page, you'll see a banner at the top of the instruction's section. Click on the "Let's Brainstorm" button to get started. For more information, review the Using Harmonize Brainstorm with ChatGPT to Create Discussion Prompts guide.
-
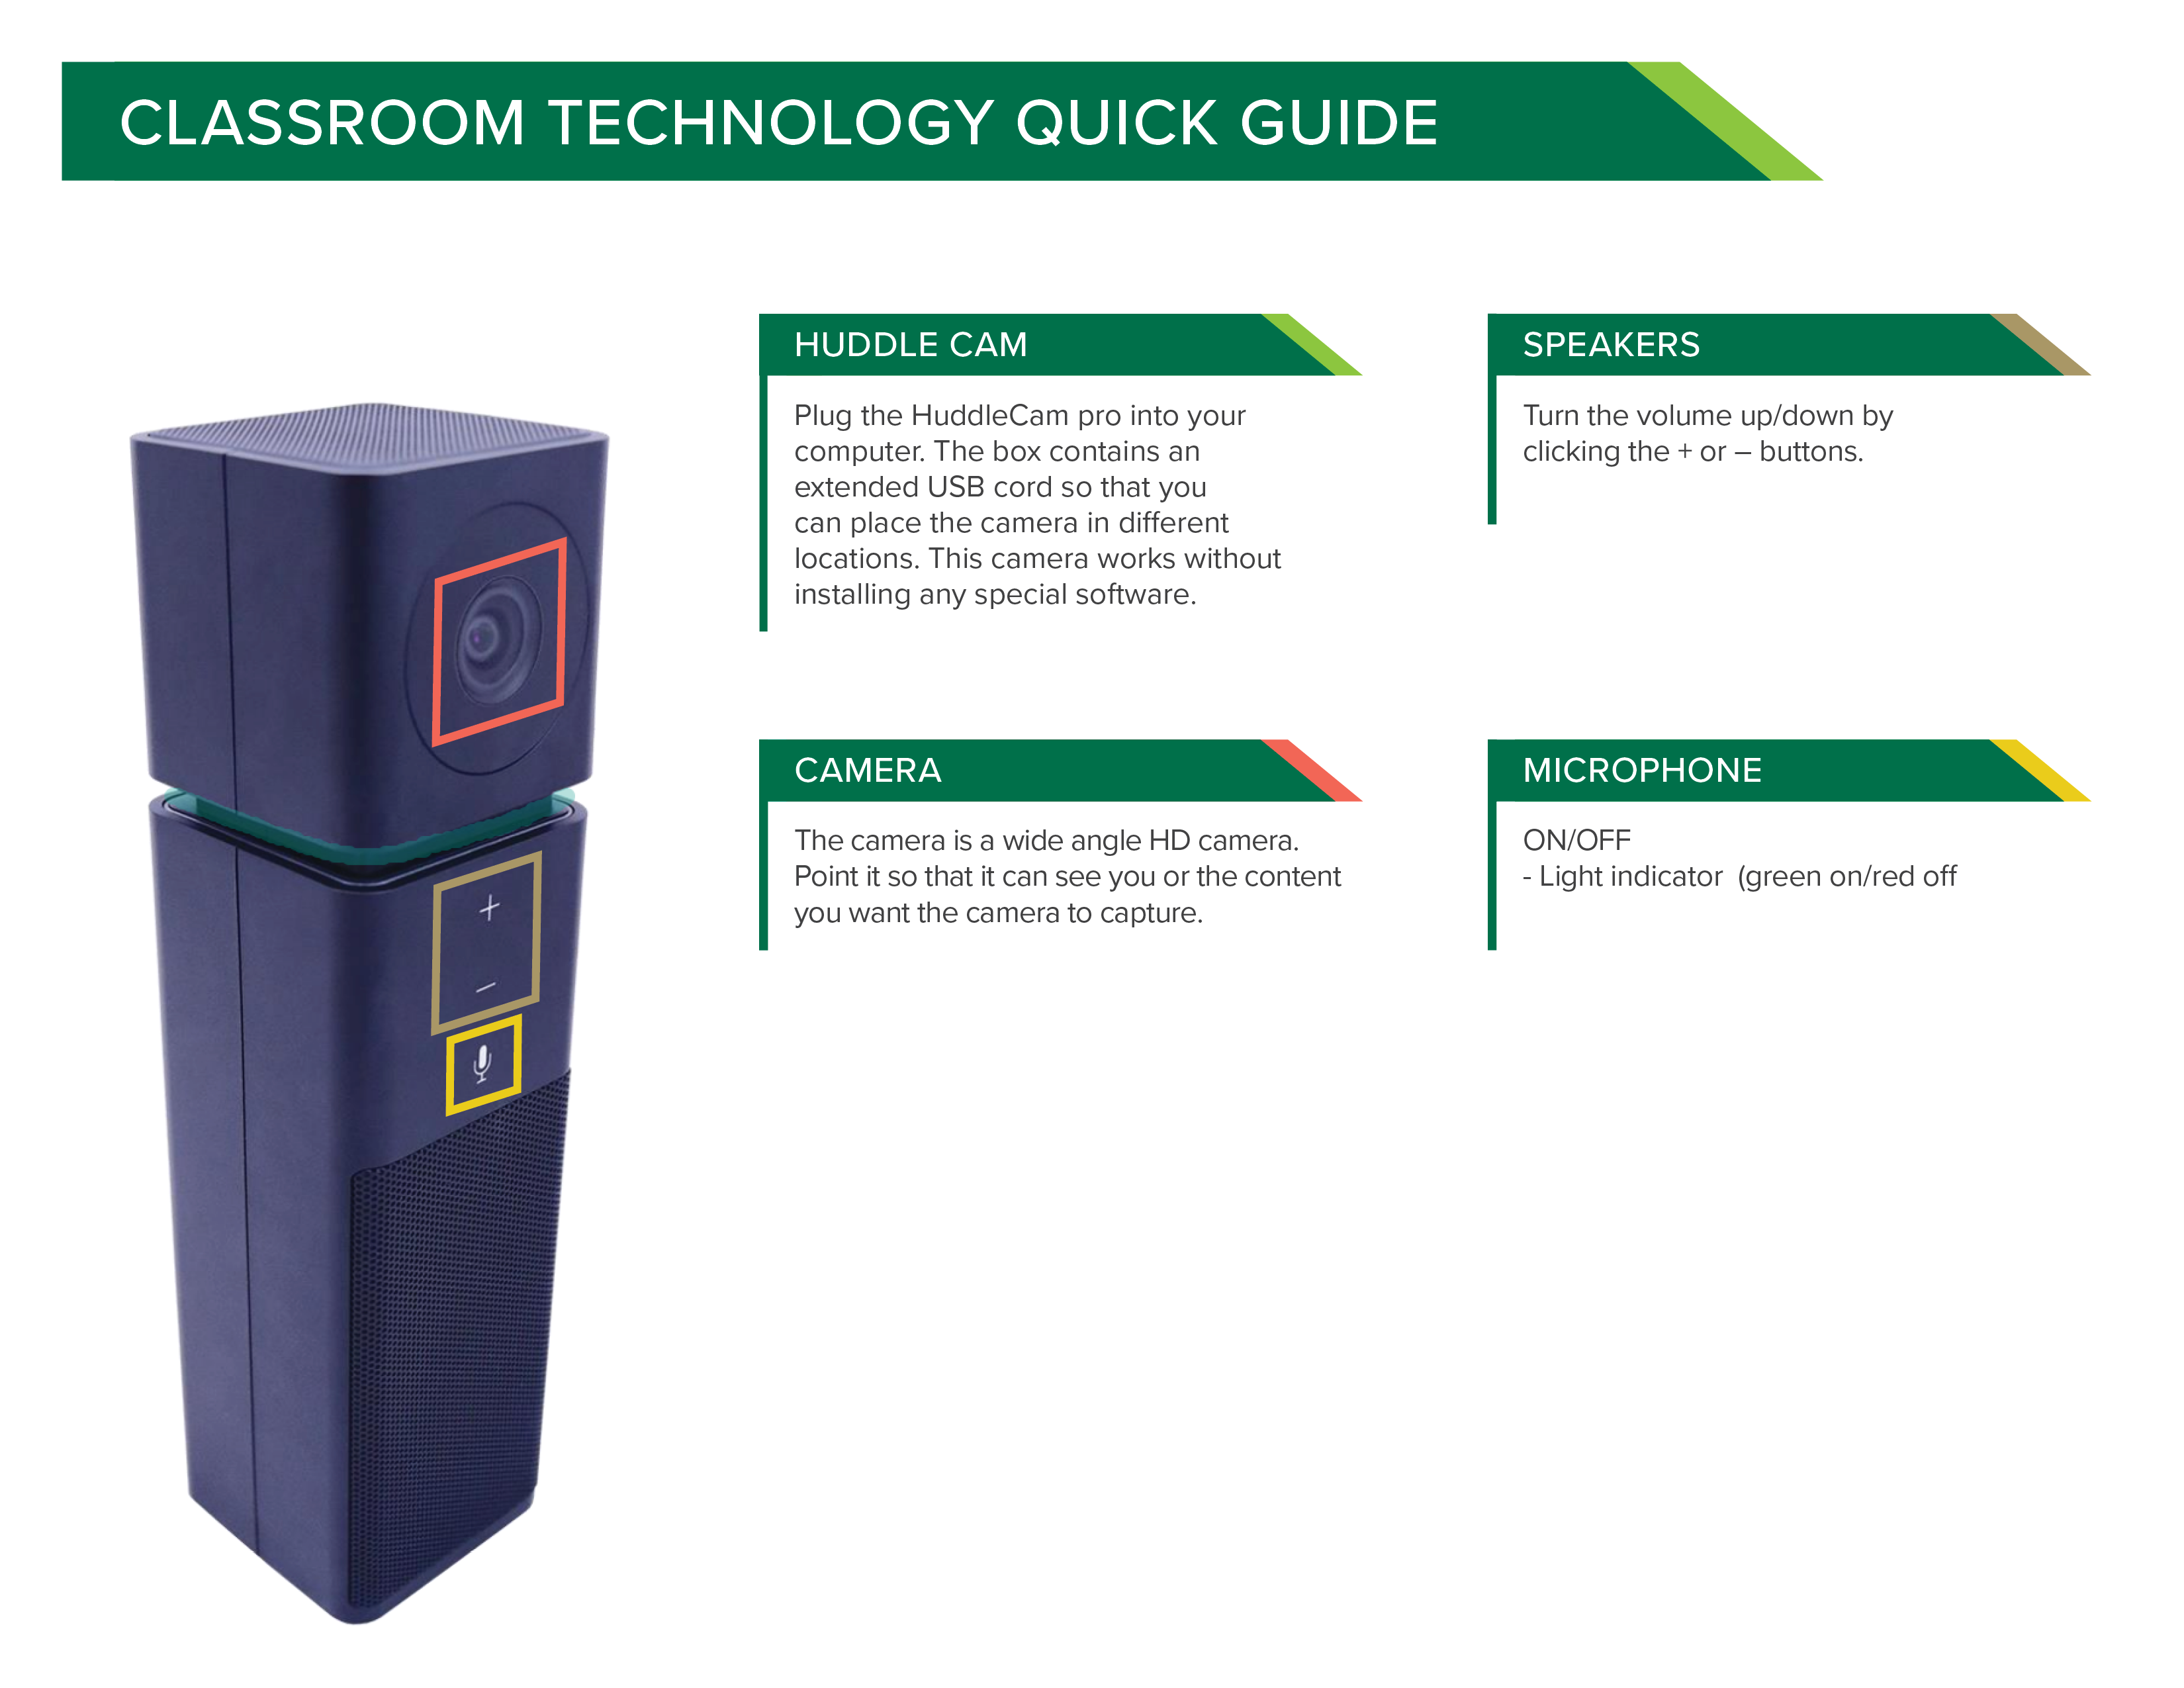
How do I set up the HuddleCam all-in-one webcam/mic/speaker for class?
This classroom is equipped with a HuddleCam that acts as the class camera, microphone, and speaker all in one. See the information below to help you set up for class.
Plug In
Plug the HuddleCam pro into your computer. The box contains an extended USB cord so that you can place the camera in different locations. This camera works without installing and special software.
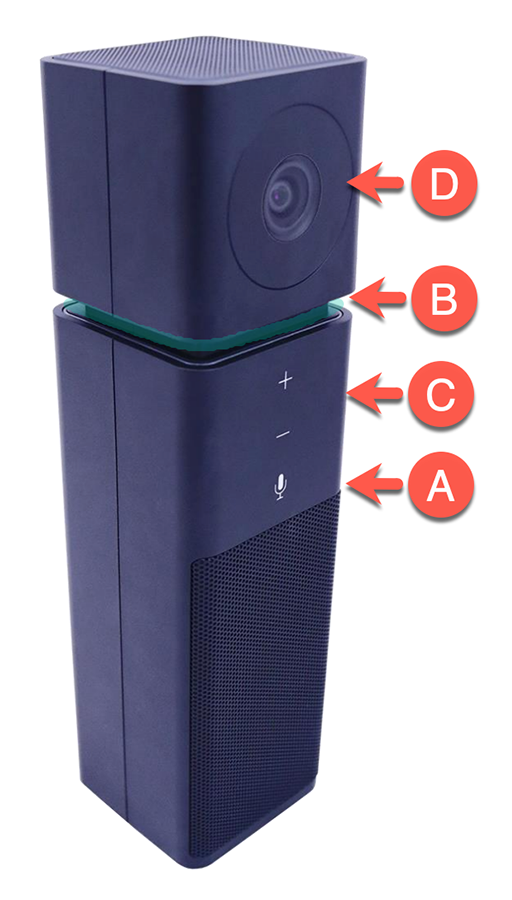
Microphone
- Click the Microphone icon (A) to turn On/Off the microphone.
- The Audio status light (B) shows the status of the microphone. Green is on, Red is off
Speaker
Turn the volume up/down by clicking the + or – buttons (C).
Camera
The camera (D) is a wide angle HD camera. Point it so that it can see you or the content you want the camera to capture.
Recording
To record, start a Zoom session and select the HuddleCam (HC-GO) as the mic, speaker, and camera. Then record the meeting to the cloud.
See the HuddleCam full manual (pdf) for more information.
-
How do I show the Document Camera?
If there is a document camera in the room, make sure it is plugged into the computer and powered on. To show the document camera on the projector and recording, make sure you are showing the Lectern Computer on the projector, then double click the Document Camera icon on the computer desktop screen. This will open the document camera software on the computer screen which is being projected to students in the class and being captured by the automatic recording. Please contact your local IT department or AskIT if you do not have the document camera software on your computer.
-
What virtual whiteboard options do I have?
Though there may be a whiteboard in the classroom, instructors may want to consider using an alternative method so that both remote and in-person students can see it live and/or in the recording.
- Document Camera: Instructors can double click the ‘Document camera’ icon on the desktop to use the document camera feed on the computer screen. Instructors can display documents, sketch/write notes, or use their own small whiteboard under the document camera. This software comes with digital annotation features as well. See Document Camera Instructional Guide (pdf).
- Zoom Whiteboard: Instructors can click ‘share’ and choose ‘whiteboard’ in Zoom. This brings up a white window and Zoom’s annotation toolbar which allows drawing, highlighting, inserting shapes, typing text, using stamps, and more. Zoom also allows remote students to annotate on your whiteboard. See Zoom Guide on using Whiteboard.
- Microsoft Ink: Instructors can Select ‘Windows Ink Workspace’ from the lectern taskbar to open it. From here, you can select ‘Whiteboard’ or ‘Fullscreen Snip’. Microsoft Ink allows you to share a link with students so they can also write on your whiteboard. See Microsoft guide on Ink.
- Microsoft OneNote: Instructors can navigate to their OneDrive at office.com or open OneNote on that computer and use its drawing features. With this method, instructors can pre-write problems, figures, etc. and finish it during class. All work is synced to their OneDrive. See more information on Microsoft OneNote.
-
How do I show the physical whiteboard to remote students and the recording?
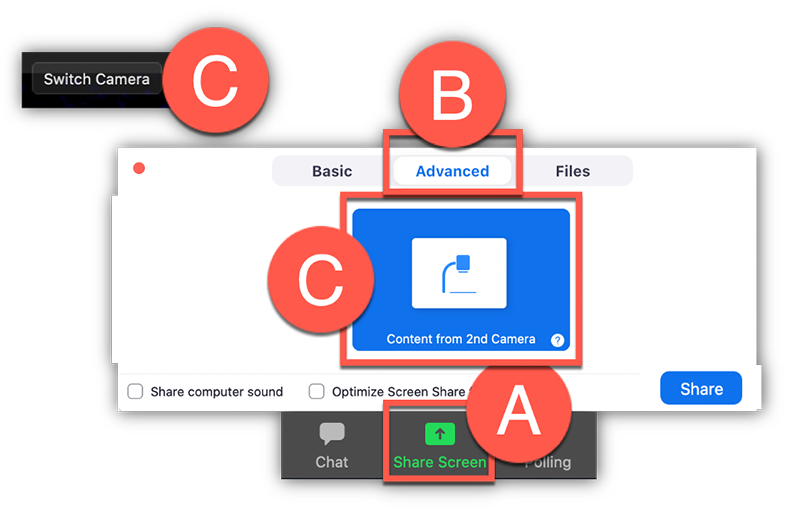
Place the HuddleCam in a location where it can see the whiteboard. Make sure that you have selected HuddleCam as your camera option in Zoom and that you are recording your Zoom meeting. See instructions below on how to share the camera as your content.
- Click Share (A).
- Click the Advanced (B) tab at the top.
- Choose Content from Second Camera (C).
- If it is showing the wrong camera, click Switch camera (D)
Live Meetings
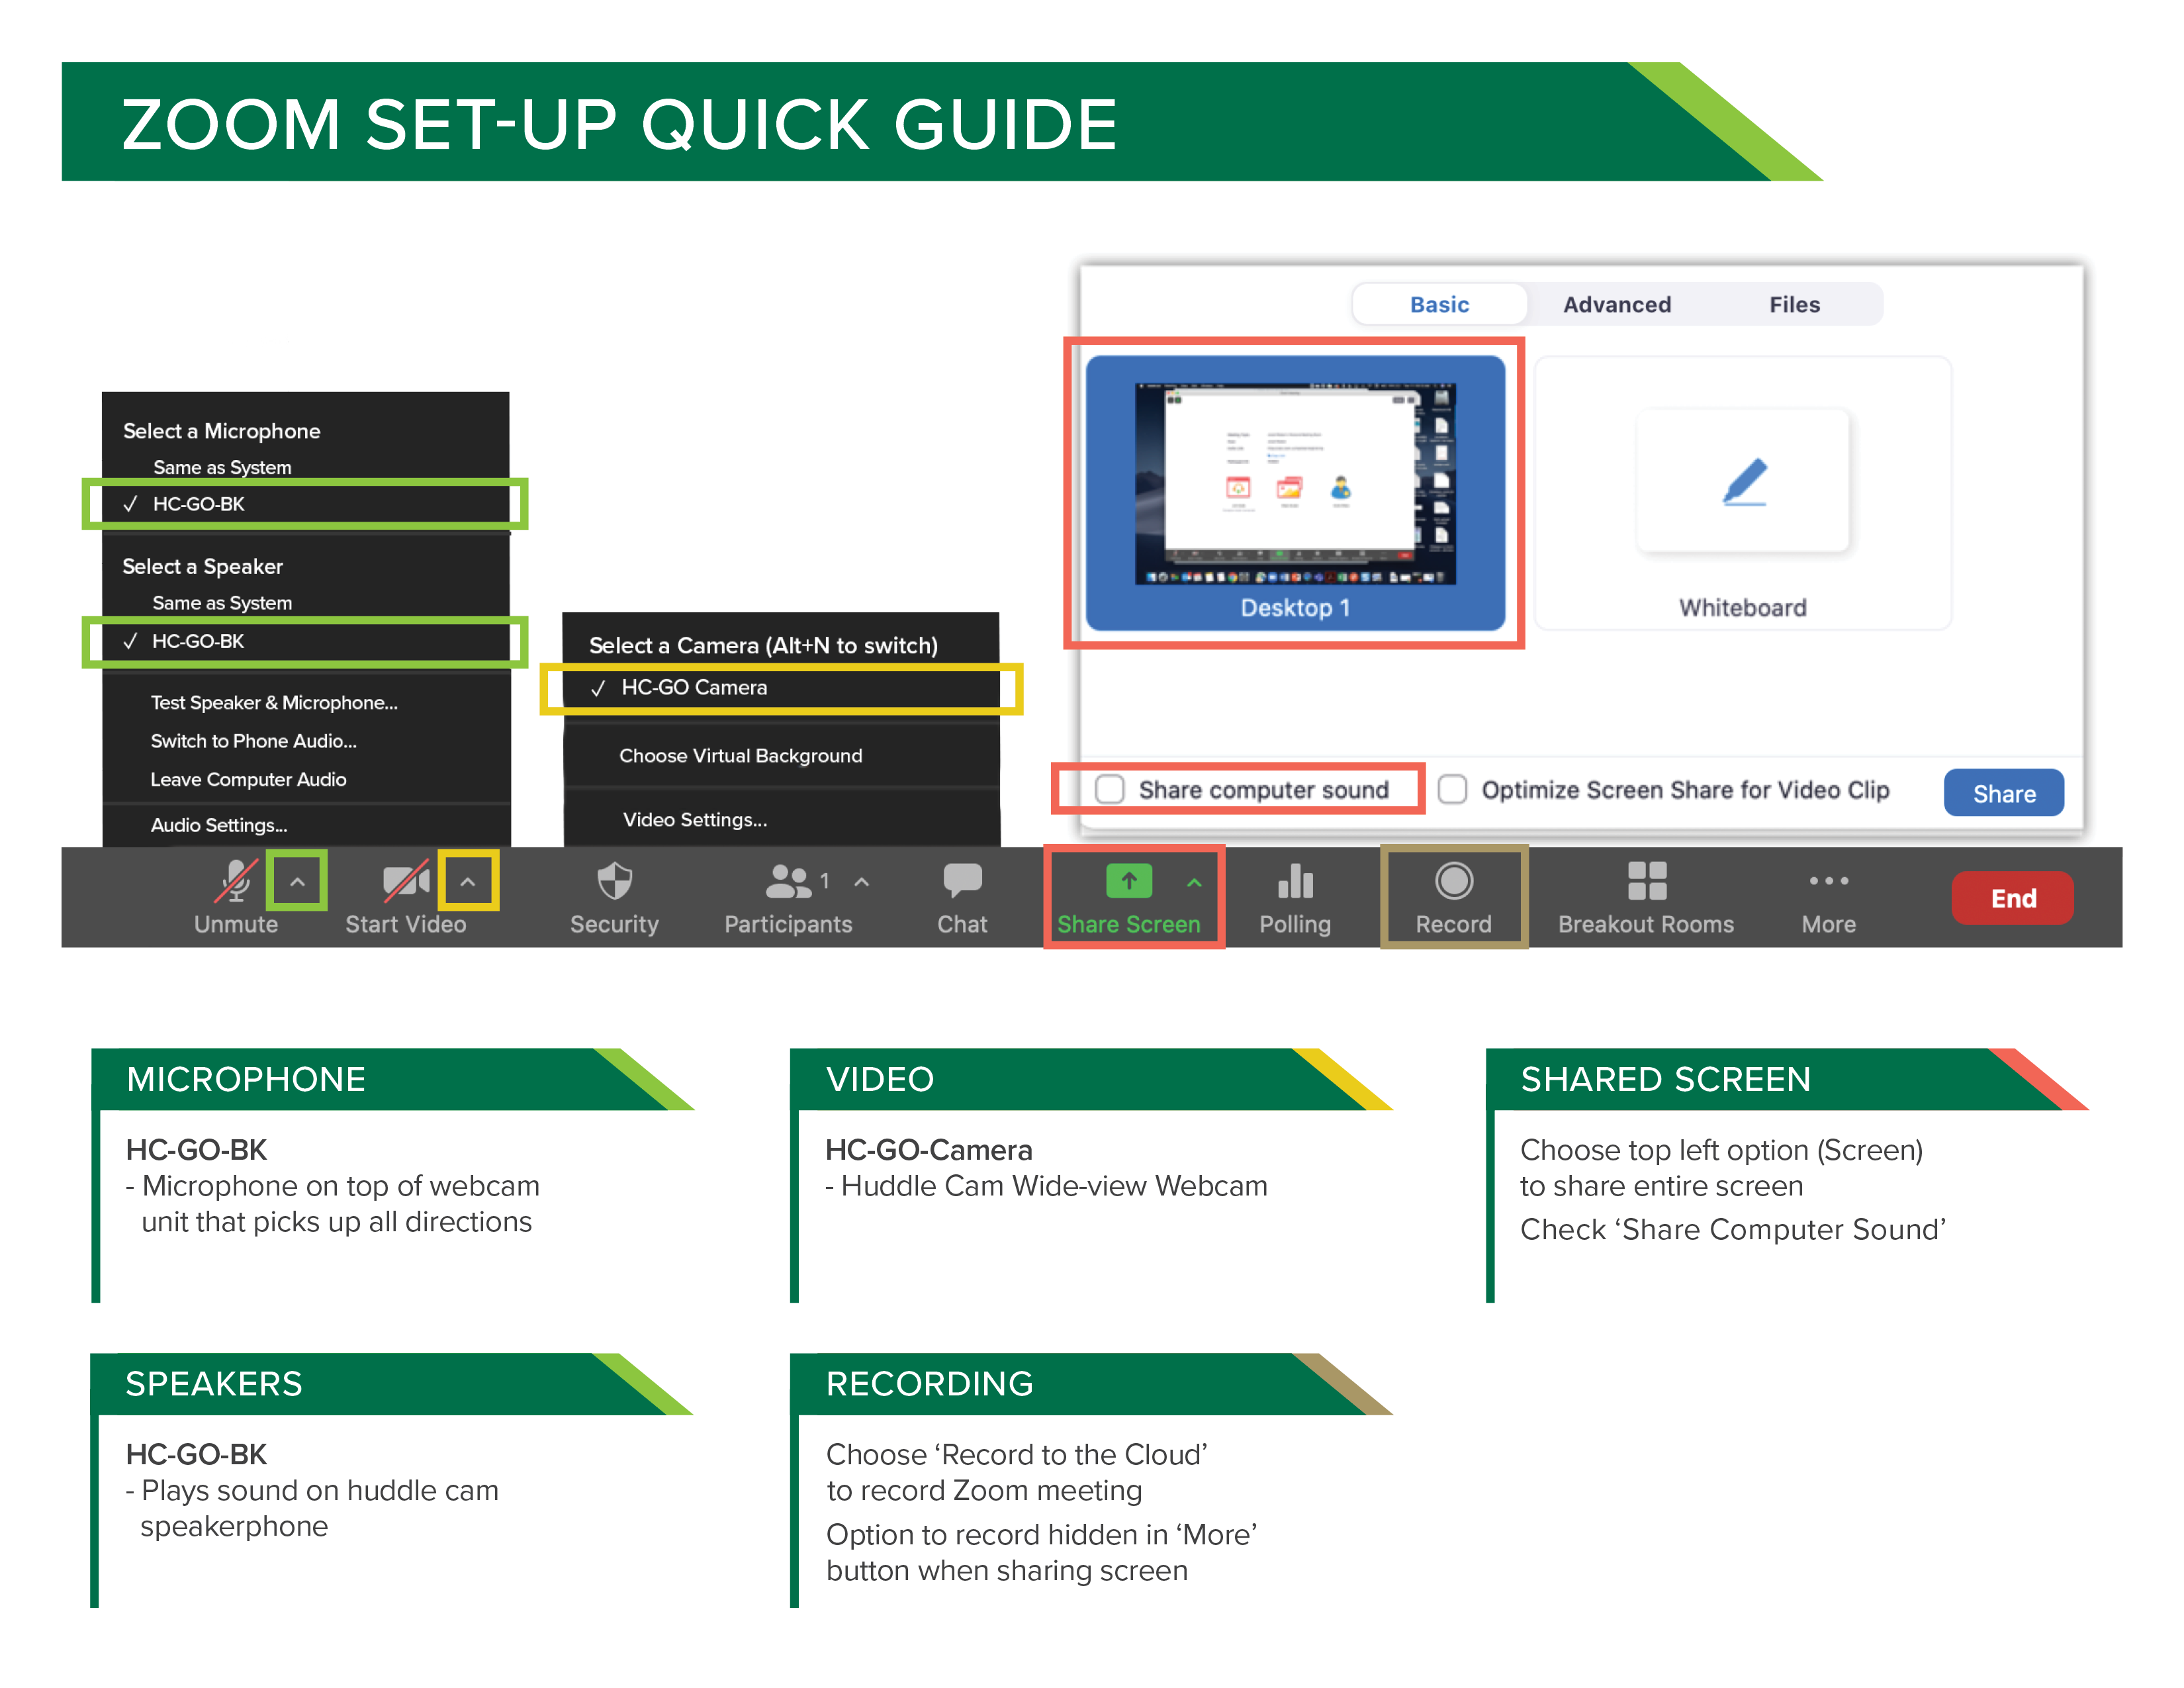
Print the above Zoom Quick Guide
-
How do students join the class remotely?
Zoom is the recommended option to allow students that are remote to see and interact with your class. Running a Zoom meeting allows students that are remote to see you and your shared content, hear you, and engage with you. See the questions below and visit the eLearning Zoom webpage for more information on using Zoom.
-
How do I schedule a Zoom meeting?
It is recommended that instructors schedule their Zoom meetings in Canvas so that students can easily access the join information needed and see the event on their Canvas calendar.
See the Zoom guide for instructors for step by step instructions on scheduling a meeting in Canvas.
-
How do I access and start a Zoom meeting in the classroom?
- Double click the Zoom (A) icon on the Lectern Computer desktop.
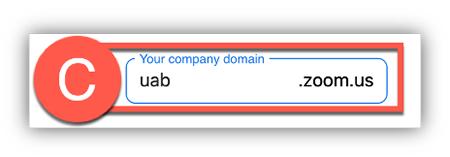
- Click Sign in with SSO (B) and type UAB (C) as the domain.
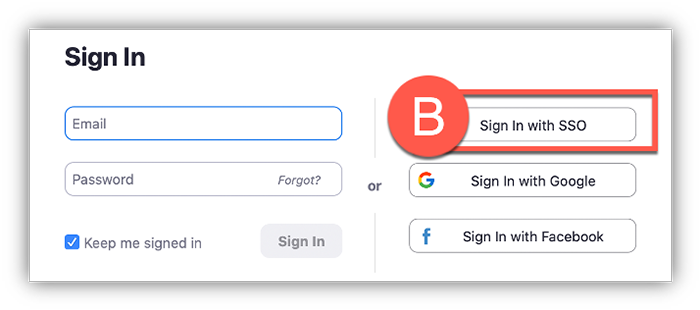
- Provide your BlazerID and Strong Password and complete the DUO requirement.
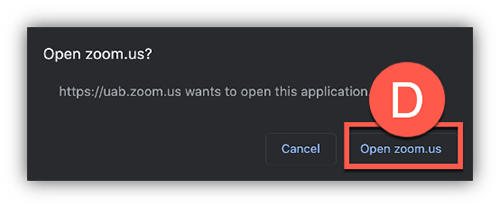
- Click Open Zoom (D) in the dialog box that appears.
- Click ‘Meetings’ to find desired scheduled meeting and click ‘Start’ or start your personal meeting room by clicking the ‘New Meeting’ icon
Note: Alternatively, instructors can start meetings by accessing the scheduled meeting in Canvas or uab.zoom.us. Click ‘Sign in’ if the “Waiting on Host to start meeting” message appears. - Double click the Zoom (A) icon on the Lectern Computer desktop.
-
How do remote students hear me?
Click Join Audio (A) on the bottom left of the Zoom toolbar and choose to Join With Computer Audio (B).
Note: Users can click the checkbox to automatically join with computer audio so that this step will not have to be repeated in future course in that particular classroom.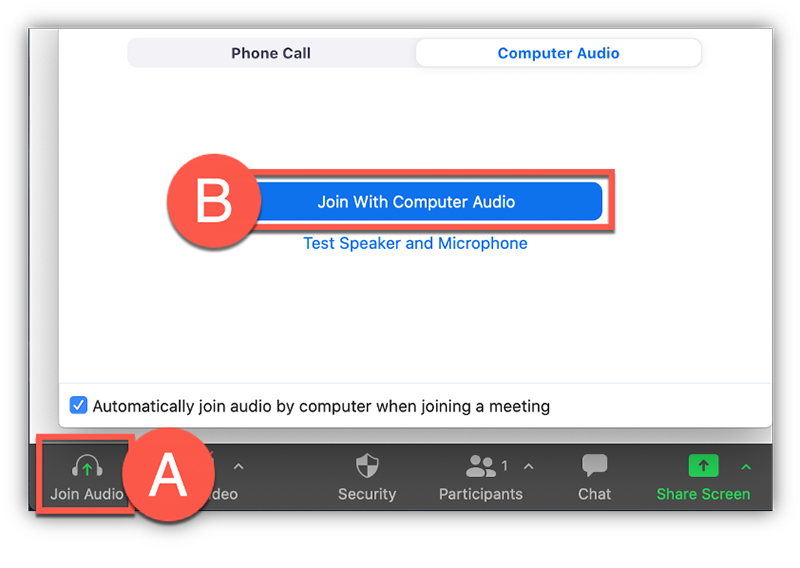
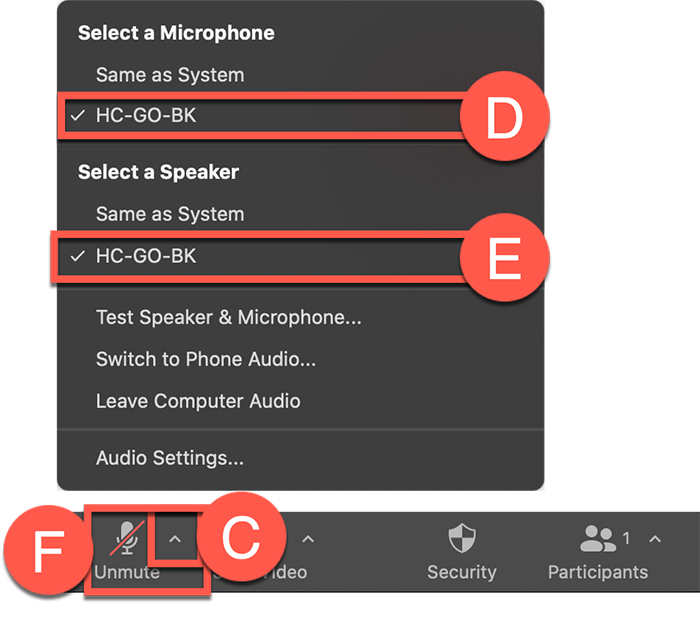
Click the Arrow (C) beside the Mute button to choose the microphone and speaker.
Microphone
Choose HC-GO-BK (D) so that participants in the Zoom meeting will hear the microphone on top of the HuddleCam.
Speaker
- Choose an HC-GO-BK (E) so that you can hear the Zoom participants across the classroom speakers.
- Click Unmute (F) when ready.
 Note: We highly recommend instructors to test their microphone and speakers to make sure everything is working properly by clicking ‘Test Speakers and Microphone' option.
 -
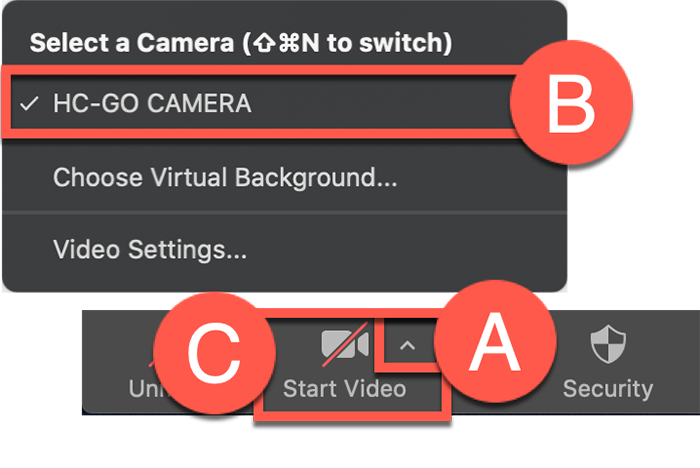
How do remote students see me?
Click the Arrow (A) beside the Start Video button to choose the camera.
Camera
- Choose HC-GO Camera (B) so that students can see you through the webcam on top of the HuddleCam webcam.
- Click Start Video (C) when ready.
-
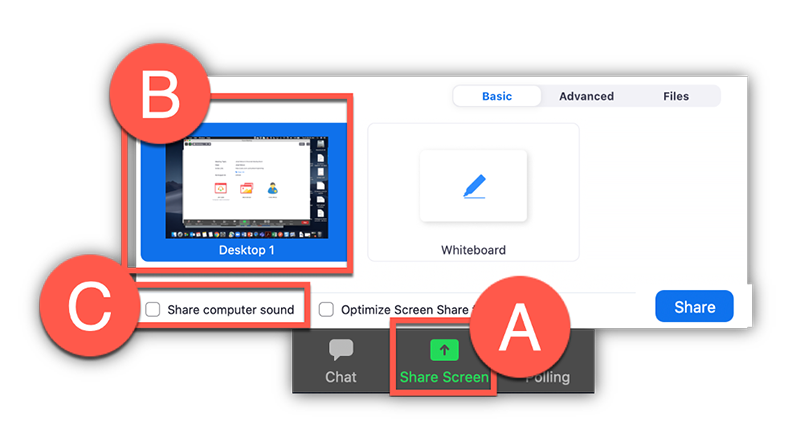
How do I share content in Zoom meeting?
- Click the Share (A) button on the Zoom toolbar and double click Desktop/Screen 1 (B) to share the same thing you are showing on the projector in class.
- Click the Share Computer Audio (C) button if you will be playing any videos that have sound.