This guide explores several options for modifying media once it is in the user’s My Media. Users can edit details such as the media name, description, and tags to help identify and organize media. Media can be edited to show a different image as the thumbnail and chapters/slides can be added. Finally, users can trim, chop, and splice the media using the video editor. Click the buttons below to navigate this guide.
Note for users of screen readers: letters in parentheses in the instructions below refer to corresponding areas on example images. If you have any questions about these instructions, contact eLearning for assistance.
Search & Select My Media
Search, Filter, and Sort
Users have the ability to search, filter, and sort through media in My Media.
- Use the Search (A) bar to search media by title, meta-data, captions, and more.
- Click Filters (B) to filter by type, status, ownership, caption status, duration, and/or date.
- Click the Sort (C) drop down menu to sort by date, alphabetical, plays, or comment counts.
- Click the View (D) tabs to toggle between collapsed view and detailed view.

Select Media to Edit
Once you find the desired media to edit, enter the edit menu by clicking edit. There are two locations that users can access the edit button for media in My Media.
- From the My Media screen, click the Pencil icon (A) on the right side of the desired media.

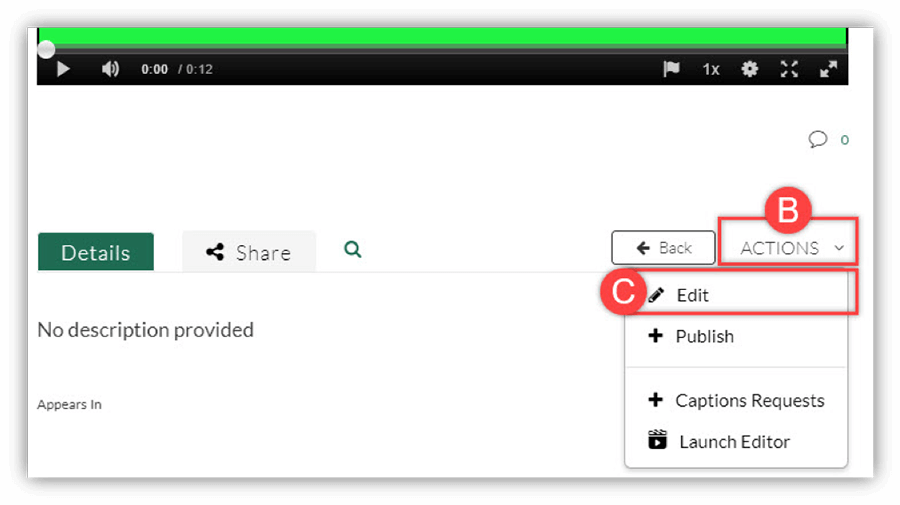
- From the Media page where the user can watch the video, click Actions (B), then click Edit (C).
Edit Menu
Once the edit menu is opened users have access to edit the details, media options, thumbnail, timeline, and even replace the video entirely. Watch the tutorial video or click a topic and follow the instructions below.
-
Edit Details
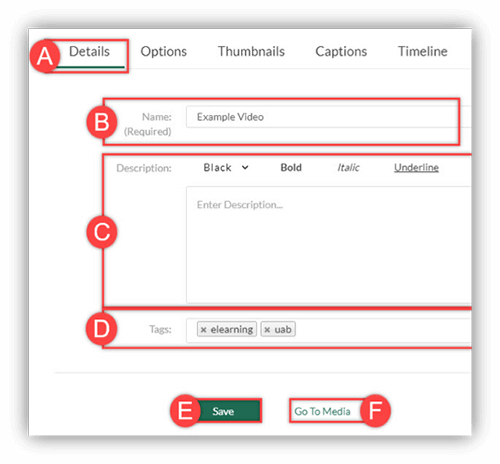
- Click the Details (A) tab to access and edit the details of media.
- The Name (B) can be edited. This field is required.
- The Description (C) can be edited using the rich text editor to include formatted words, hyperlinks, and pictures.
- Tags (D) can be removed or added to make searching for the media easier.
- Once edits have been made, click Save (E) to save the changes.
- Click Go to Media (F) to go the media page and see changes made.
-
Edit Options
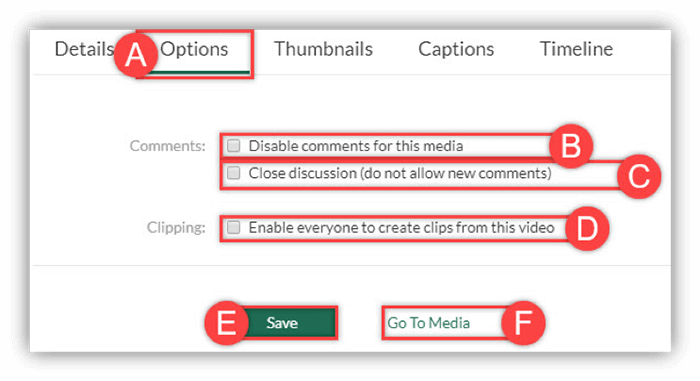
- Click the Options (A) tab to edit the comment and clipping options of the media.
- Choose to Disable comments (B) to remove the comment window under media in Media Gallery.
- Choose to Close discussion (C) to let past comments remain but deny further commenting.
- Choose if users can Create a clip (D) of the media in their own My Media. For instructions on how to create a clip, see the Split, Delete, and Fade In/Out section of the Video Editor instructions below.
- Once options have been chosen, click Save (E) to save the changes.
- Click Go to Media (F) to go the media page and see changes made.
-
Edit/Add Collaborators
Users can give other Kaltura Media Space users permission to collaborate on media in My Media. Permission levels include co-view, co-publish, and co-editor.
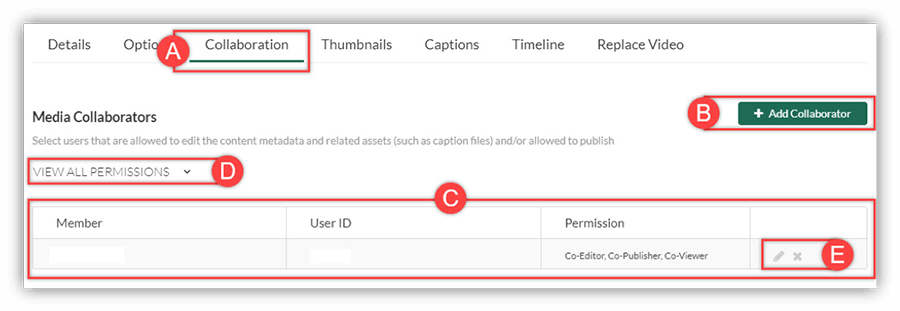
- Click the Collaboration (A) tab to edit or add collaborators to media.
- Click + Add Collaborator (B) to give a user or users permissions to your media.
- Current Collaborators (C) and their permissions to that media will be listed including their BlazerID.
- Click the Filter (D) dropdown menu to filter the list by permission level.
- Edit collaborator permissions (E) or remove collaborator using the pencil or “X.”
Add a Collaborator
Once you click + Add Collaborator (B) mentioned above, a dialog box will appear. Follow the directions below.
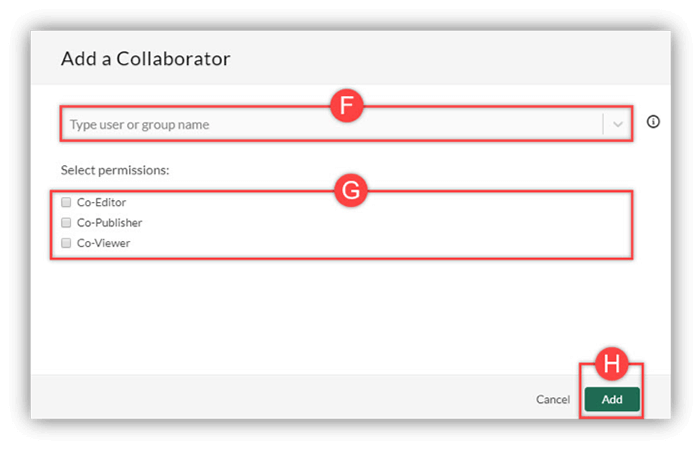
- Click the User (F) textbox and type in either the BlazerID or name of desired user(s) to be added.
- Check the box(es) of desired Permissions (G) for the selected collaborator. Multiple selections can be made.Notes:
Co-Editor allows collaborators to edit the original media content. (Be careful)
Co-Publisher allows collaborators to publish your media in their courses but cannot edit it.
Co-Viewer allows collaborators to view the video but cannot publish or edit the media. - Click Add (H) to save the changes made.
-
Edit Thumbnail Image
A thumbnail is the image that users see before the video is played. The default thumbnail image selected for media is the first frame of the video. This image can be changed by using one of the methods below.
Upload Thumbnail
Users can upload their own image to be the thumbnail image.
- Click the Thumbnail (A) tab to edit the thumbnail of the media.
- Click Upload Thumbnail (B), select the desired image file, and choose upload. The image will load and become the default thumbnail for the media.

Capture Thumbnail
Users can choose a particular second of the video and capture it as a still image to be used at the thumbnail.
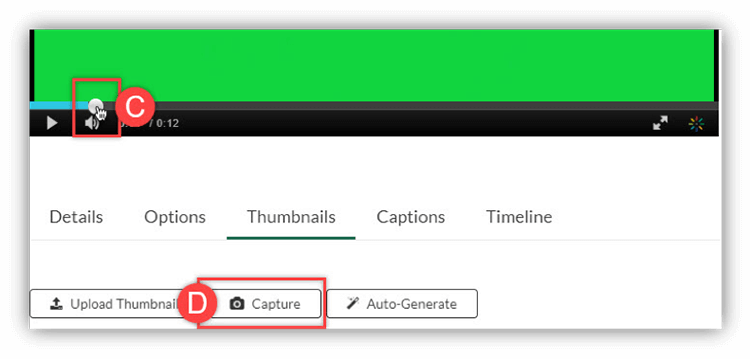
- Click and drag the white Circle (C) on the playback timeline to the desired time in the video.
- Click Capture (D). The image displayed in the player at that moment will become the thumbnail image.
Auto Generate Thumbnail
Users can choose a thumbnail image from a selection that is auto-generated by Kaltura.
- Click Auto-Generate (E). A dialog box will appear with several images that are created from your media. Choose the desired image and it will become the thumbnail image for the media.
- Download the current thumbnail image used in Kaltura by clicking Download (F).

-
Edit Timeline
Users can edit the timeline of the media which includes chapters and slides. More information is below.
- Click the Timeline (A) tab to edit chapters and/or slides for media.
- Current Chapters (B) are shown on the timeline with a bookmark icon. Click this icon to edit that chapter.
- Current Slides (C) are shown on the timeline with a page icon. Click this icon to edit that slide.
- Click the Add Chapter (D) icon to add a new chapter at the current place in the timeline.
- Click the Add Slide (E) icon to add a new slide at the current place in the timeline.

Edit/Insert Chapters
Chapters allow users watching the video to navigate through the video by clicking the provided chapter links. Chapter information and tags are also searchable in the media player. Once you have clicked Add Chapter, follow the directions below.
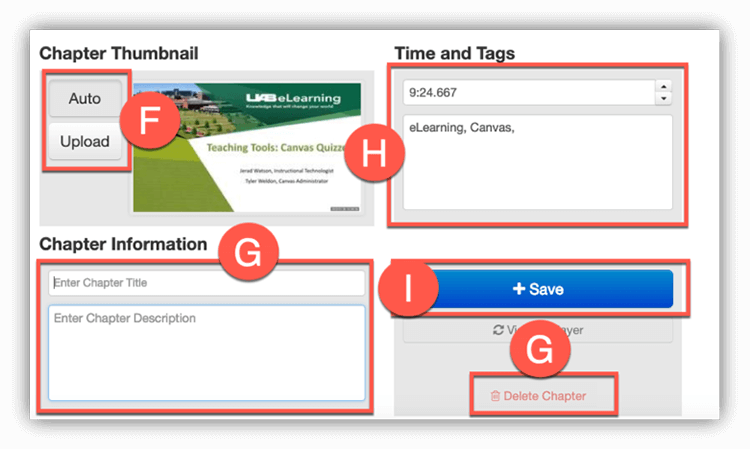
- Choose the chapter Thumbnail (F) by either uploading a file or keeping the auto image from the media.
- Type in the Title and Description (G) of chapter that will display and be searchable in the player.
- Choose the time on the Time and Tags (H). Time will be the start of the chapter and tags will be searchable.
- Click Save (I) to save your changes or Delete (G) to delete the chapter.
Edit/Insert Slides
Users can record a video of someone presenting and then add slides afterwards. Follow the directions below.
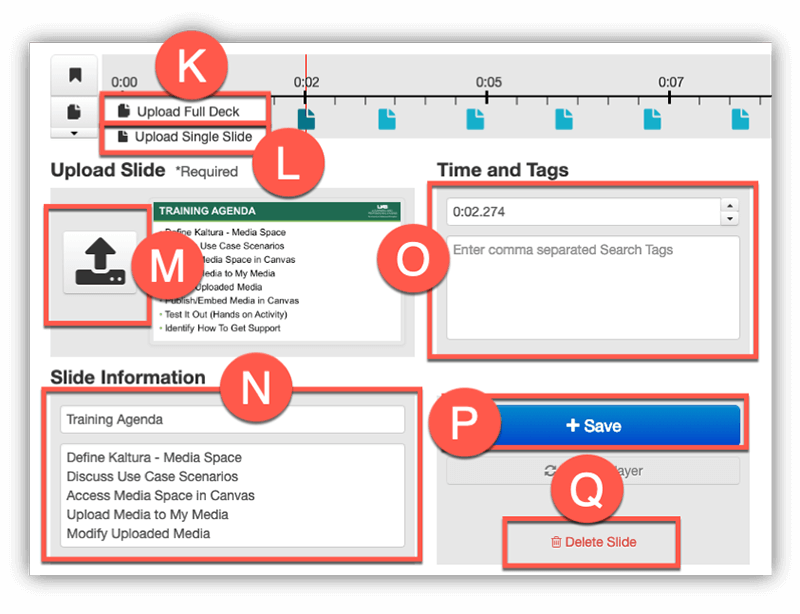
- Click the Add Slide drop down menu and either select Upload Full Deck (K) which allows full PowerPoint presentations or PDFs to be uploaded and then moved to the desired locations or select Upload Single Slide (L) to insert one slide at that point in the timeline.
- Click the Upload (M) symbol to choose the individual slide. PPT, PPTX, or PDF is accepted.
- Enter or edit the Title and Description (N) that is searchable.
- Enter or edit the Time and Tags (O). Time is where the slide will be placed and tags are searchable.
- Click Save (P) to save your changes or Delete (Q) to delete the slide.
-
Replace Video
Users can upload a video to replace a current video in My Media. The newly uploaded video replaces the original media in My Media and would be published everywhere the original video is published.
Note: Beware that this action will remove the previous video permanently.- Click the Replace Video (A) tab.
- Click + Choose a file (B) to upload a new video.

Video Editor
Kaltura provides a media editor that allows users to trim, split, delete and fade in/out. Changes can be made to the original or can be applied to a copy of the original media. Watch the tutorial video or follow the directions below to access the media editor and make edits.
- YouTube videos cannot be edited in the Kaltura editor to protect the content copyright.
Caution box
Launch Video Editor
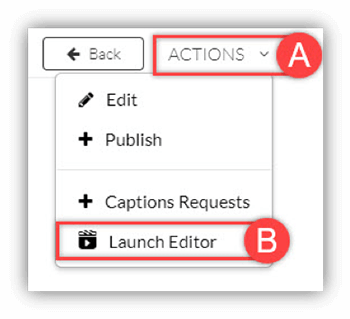
- From the media page, click the Actions (A) dropdown menu and click Launch Editor (B).
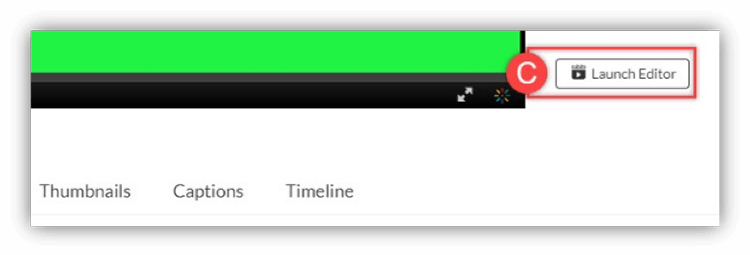
- When editing other details of media, the Launch Editor (C) button is at far right of the screen.
Video Editor Window Layout
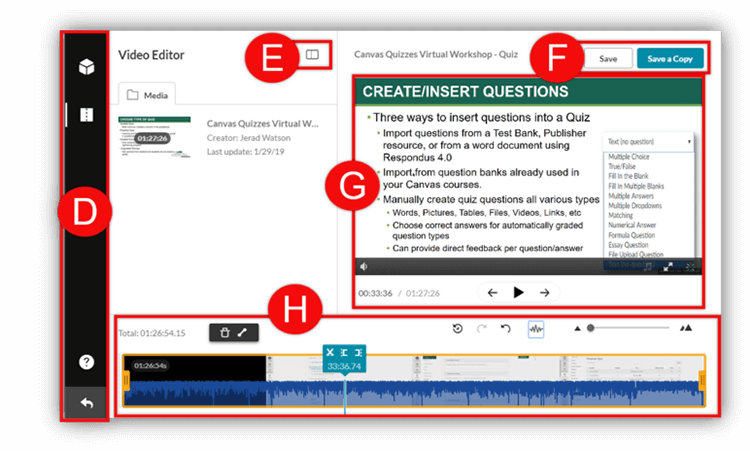
- The Left Navigation (D) bar has options to access editor/quizmaker/hotspots, get help, and exit editor.
- The left pane displays media details and can be collapsed by clicking the open/close left pane (E) button.
- Save (F) options are on the top right.
- The Media Player (G) and playback buttons are used to preview timeline modifications.
- The Timeline (H) is at the bottom and provides options to modify media.
Trim Media
Users can use the trimming tool to trim the start and/or end of their media.
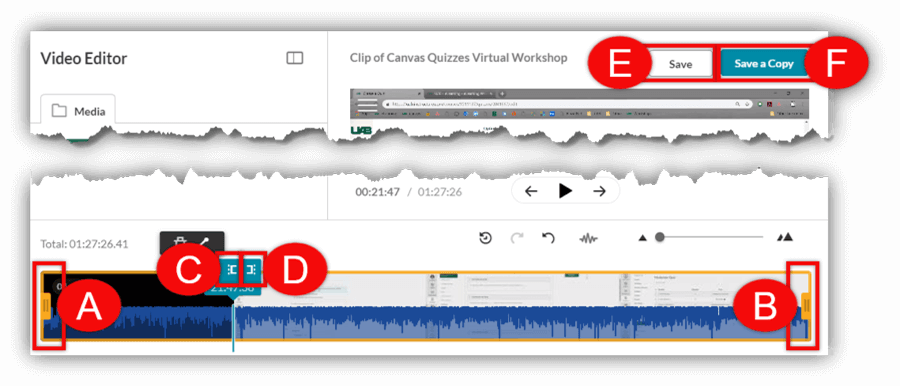
- Click and Drag the left Yellow Handlebar (A) to the desired starting place of the video.
- Click and drag the right Yellow Handlebar (B) to the desired ending place of the video.
- Alternatively, click the desire location on the timeline or move the blue timeline marker to the desired location on the timeline and click the Set in (C) icon to delete everything to the left and the Set out (D) icon to delete everything to the right.
- Click Save (E) to make these changes to the original media or click Save a Copy (F) to save the changes to a copy of the media with the original media left unchanged.
Split, Delete, and Fade In/Out
Users can split or cut the timeline into sections and delete desired sections from the timeline. Users can then add fade in/out effects to transition from one section on the timeline to another. Follow the directions below.
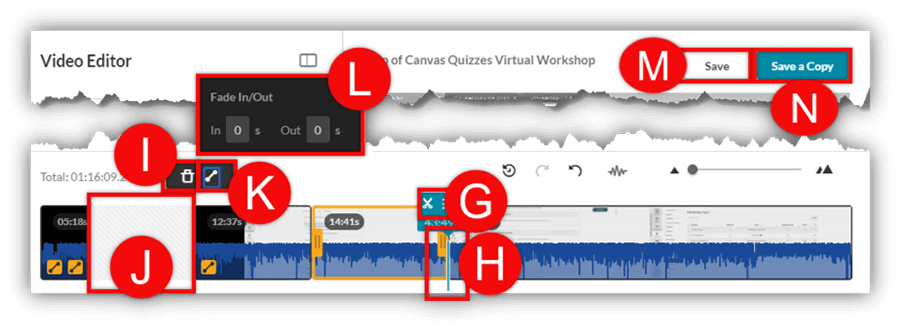
- Move the blue Timeline Marker (G) to the starting location of the piece of video you want to remove and click the Split (H) icon to cut the timeline at that point. Repeat for the end of section of video.
- Click the section that is to be removed to select it and click the Delete (I) icon.
- The Gray Area (J) will automatically be skipped. Do NOT attempt to drag the sections together.
- Select a section of the remaining video and click the Fade in/out (K) icon.
- Input the desired amount of seconds of fade in/out (L) in the dialog box. Fade icons will appear to show which sections have fade in/out applied.
- Click Save (M) to make these changes to the original media or click Save a Copy (N) to save the changes to a copy of the media with the original media left unchanged.
