Kaltura has a feature that allows media to be turned into an Interactive Video Quiz. Users can seamlessly embed multiple choice, true/false, and open ended questions as well as reflection points at any point in a video. As users watch the video, each question appears at its chosen point; the video continues after the user answers the question. Flexible settings allow quiz creators to choose whether to allow users to repeat sections, skip questions, revise answers, receive hints, and discover the correct answers. Click the buttons below to navigate this guide.
Note for users of screen readers: letters in parentheses in the instructions below refer to corresponding areas on example images. If you have any questions about these instructions, contact eLearning for assistance.
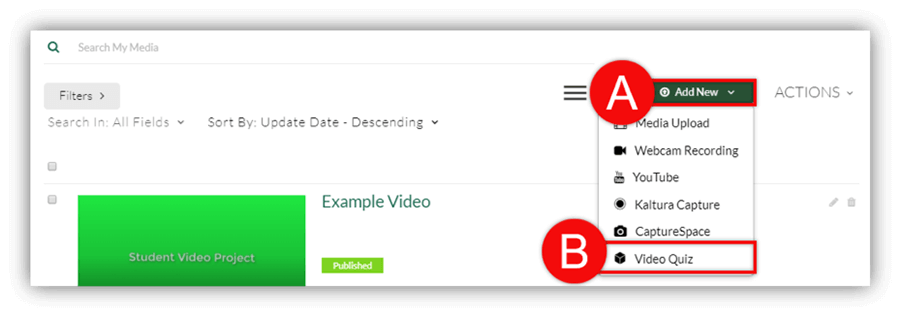
Select Media
Quiz creators must select or upload a video to use for their Interactive Video Quiz (IVQ). Follow the directions below.
- From My Media, click Add New (A) at the top right of the page.
- Click Video Quiz (B).
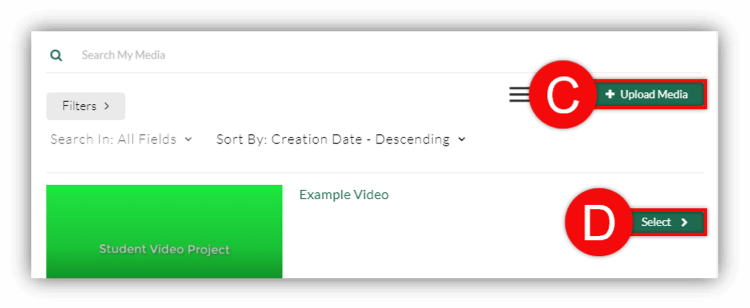
- Select the media you would like the quiz to relate to. You can either select an Existing Video (C) or Upload (D) a new one. Choosing an existing video will create a copy of the video to be used for the Quiz and will not impact or change the original video.
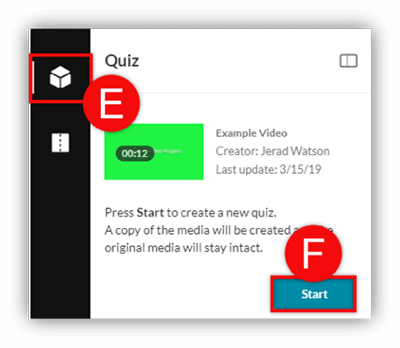
- Alternatively, users can also decide to create a quiz from a video when editing by clicking the Quiz (E) icon at the top left of the video editor screen.
- Click Start (F) to create a copy of the video that will be used to make the video.
Choose Quiz Settings
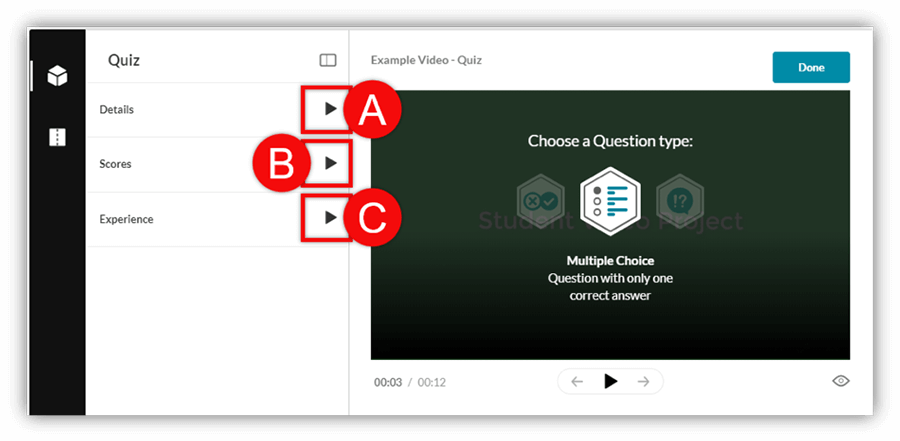
Quiz creators can modify the quiz details, scoring options, and quiz experience to their preferences or use the default settings.
- Click the triangle beside Details (A) to access and change the quiz details.
- The ‘Quiz Name’ can be renamed.
- Marking the ‘Show Welcome Page’ enables a welcome screen that appears and tells viewers this video is an Interactive Video Quiz. The welcome message can be customized.
- Marking the ‘Allow Download of Question List’ option allows viewers to download the quiz questions before they play the media.
- Click the triangle beside Scores (B) to access and change the scoring options.
- Marking the ‘Allow Multiple Attempts’ option lets you set how many attempts and what score should be kept (Highest, Lowest, Latest, First, or Average).
- Marking the ‘Show Scores’ option allows viewer to see the quiz score page after the quiz is submitted, which shows the number they got correct out of the total number.
- Marking the ‘Include Answers’ option will allow viewers to see the corresponding correct and incorrect answers to each quiz question after submitting.
- Click the triangle beside Experience (C) to access and change the quiz experience for end users.
- Marking the ‘Allow Answer Change’ option will allow views to change an answer before submitting the entire quiz.
- Marking the ‘Allow Skip’ option will allow viewers to skip a question and return to answer it later.
- Marking the ‘No Seeing Forward’ option will keep viewers from scrubbing or fast-forwarding through the video. A customizable alert message will display if users try.
Add Quiz Content
- Play the media to the desired location or click the Location (A) on the timeline. Users can Zoom in/out (B) on the timeline to get a more accurate moment.
- Click the + Add a Question (C) button and select the desired quiz content (D) to insert at the current moment by clicking the corresponding icon.
- Options include:
- Multiple Choice: Question with up to four answer options. (Limit one correct answer).
- True/False: Question with the choice of either true or false.
- Reflection Point: No question is asked. A box will display showing desired text.
- Open-Ended Question: Allows user to type text answer to question
Note: An Open Question is not gradable and is considered in the same way as a Reflection Point is considered. Both question types have no impact on the grade.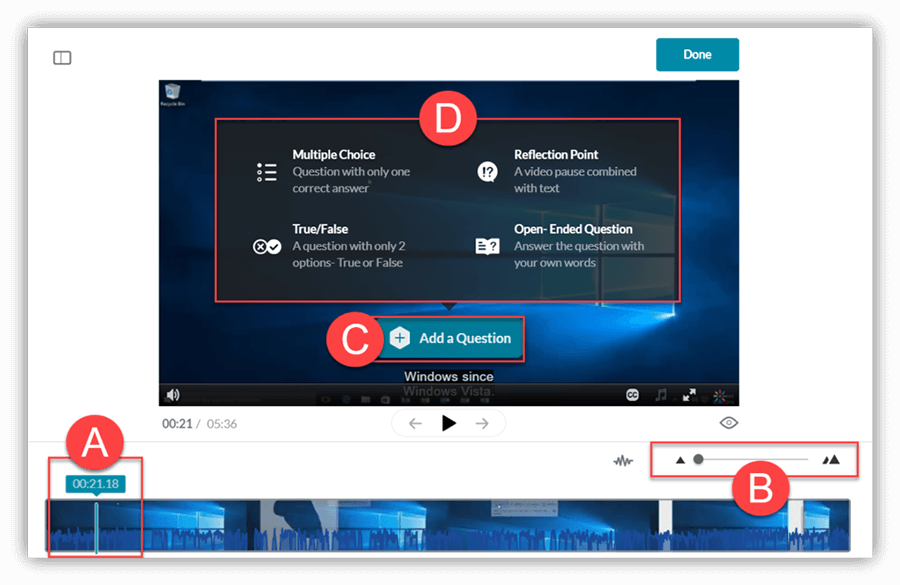
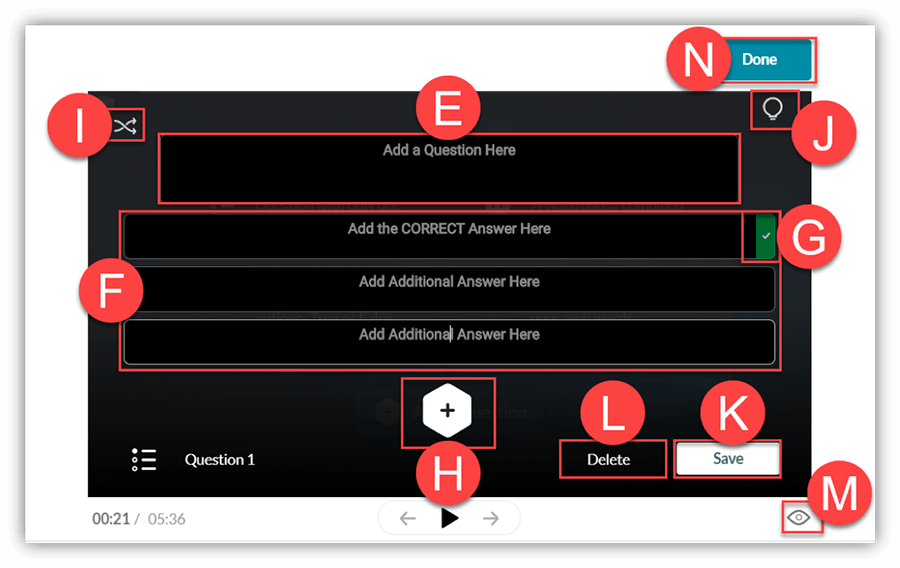
- Enter the Question Content (E) in the top box.
- Enter Answer Options (F). At least two answer options are required. Type the Correct Answer (G) in the box with the green checkmark on the side.
- Click the Plus (H) icon to add another answer option (four max).
- Users can click the Shuffle (I) icon at the top left or drag and drop answer options in a desired order so that correct answers are not always the first option.
- Click the Light Bulb (J) icon at the top right to add a hint or answer rationale.
- Click Save (K) to save this question or Delete (L) to discard.
- Repeat steps 1-8 above until all quiz content has been added.
- Click the Preview (M) icon to see a preview of the created quiz.
- Click Done (N).
Quiz Analytics
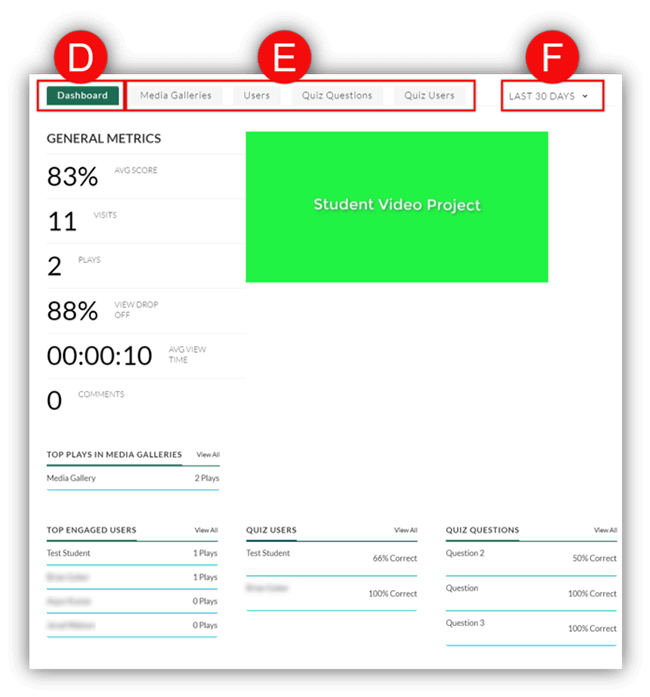
Quiz creators can see important analytics from quizzes they create such as the average score, viewer drop off rate, average time viewed, and details on each question or quiz user.
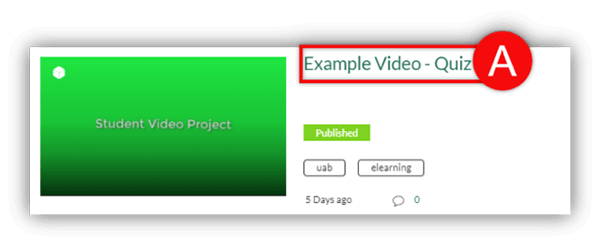
- Access the media page of the desired video by clicking the Title of the Video (A).
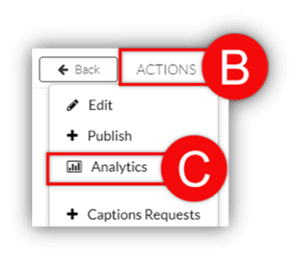
- Click the Actions (B) dropdown menu, then click Analytics (C).
- The Analytics page will appear on the Dashboard (D) tab showing a summary of various analytics.
- Click the Other Tabs (E) to see more detail in that area of analytics. Options to export or print are available within these tabs.
- Click the Days (F) dropdown menu to select the desired time range to be considered.
Kaltura Assignment
While the Interactive Video Quiz feature is best used to increase student engagement in videos, Kaltura can also be connected with a Canvas assignment to pass users’ scores to the gradebook. There are known limitations with this type of assignment but saves the instructor from having to input grades into the gradebook manually. Follow the directions below.
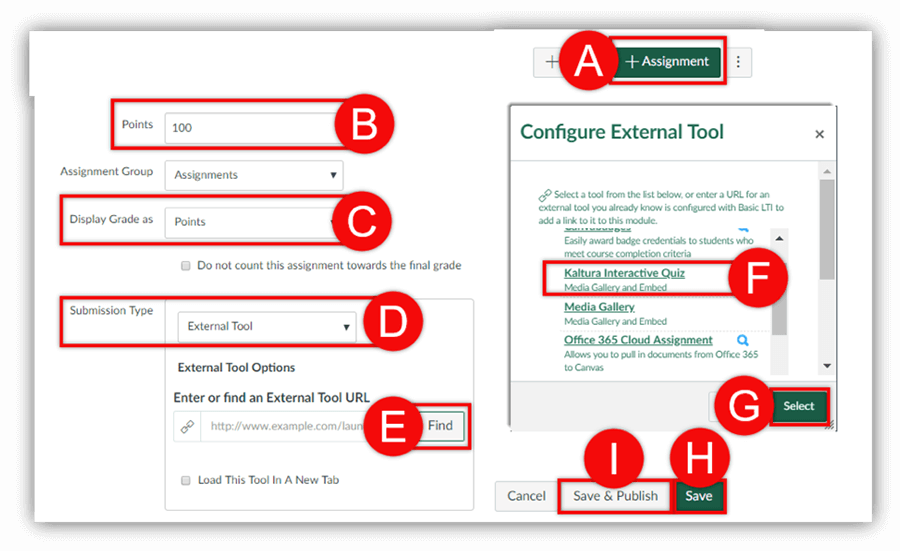
- Create a Canvas Assignment (A).
- Fill in assignment details (B) including a point value.
- Choose if grade should display in points or percentage (C).
- Click the Submission Type (D) dropdown menu and choose External Tool.
- Click Find (E).
- Find and select Kaltura Interactive Quiz (F) in the list of tools.
- Choose desired video quiz from your My Media and click Select (G).
- Click Save (H) or Save and Publish (I) if the video is ready for students to take.
- Multiple questions cannot be placed at one frame or back to back in the video.
- Only a numeric value is sent to the gradebook.
- Submission details are not available in the Canvas SpeedGrader.
- Grades will not be passed to the gradebook if the point value in the Canvas assignment is zero.