What to do in Qualtrics before using the Qualtrics LTI tool
Build the survey including survey instructions, questions, answers etc. and make sure to publish the survey by clicking on the Publish button on the survey page (A). Once published, Qualtrics LTI will recognize the survey.

What to do on Qualtrics survey overview page in Canvas
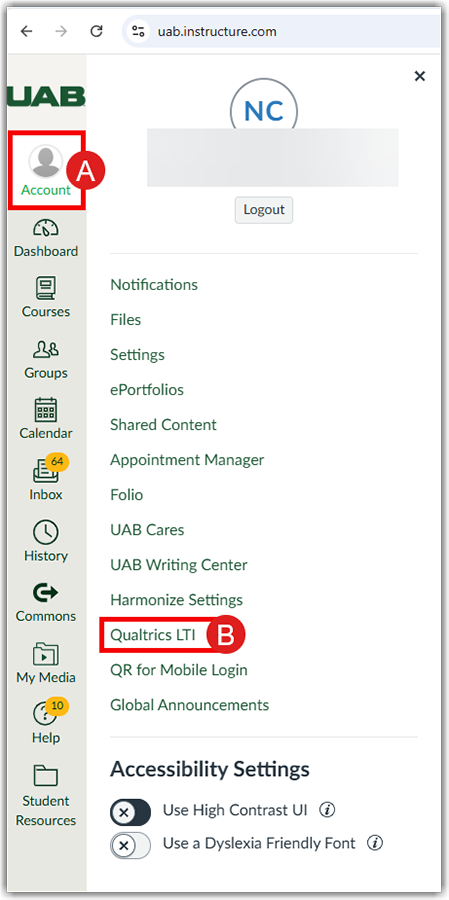
- Log in to Canvas, click Account (A), and click Qualtrics LTI (B) in the user navigation.
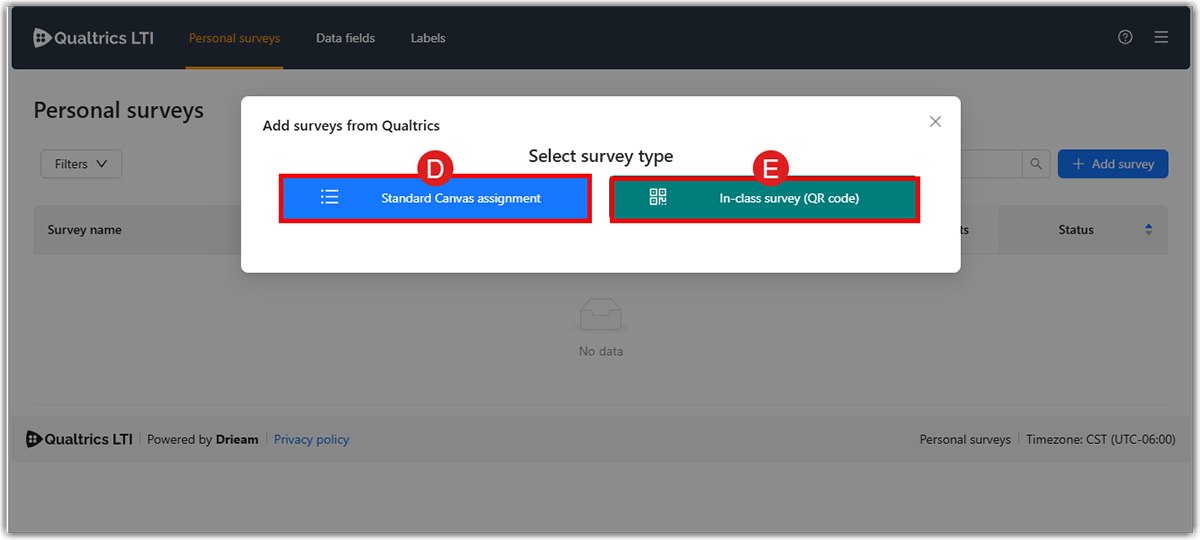
- Click on the Add survey (C) button.

- You will see two buttons on the pop-up window: Standard Canvas assignment (D) and In-class survey (QR code) (E). In-class surveys can be used during lectures where the teacher will provide a QR code for the students. Via scanning the QR code, students fill out the survey. Like standard Qualtrics LTI surveys, the in-class survey type can be added to any Canvas assignment. More information on what and how to create in-class surveys can be found on How to use in-class surveys guide. Click on the Standard Canvas assignment (D).
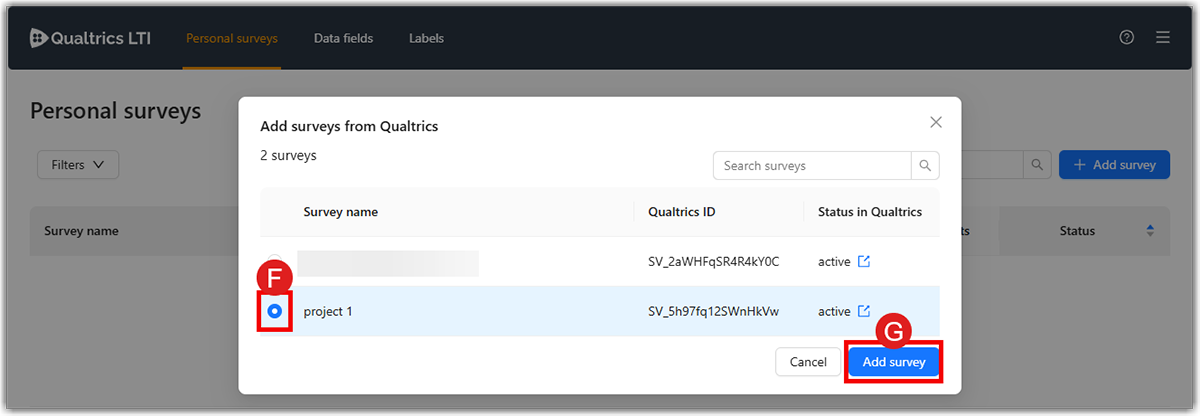
- You will see all your published Qualtrics surveys in the pop-up window. Check the checkbox (F) next to the survey(s) you would like to add. Click Add Survey (G) to add it to your surveys.
- When you open Survey Grading, you see two main categories:
- With Canvas submission (H).
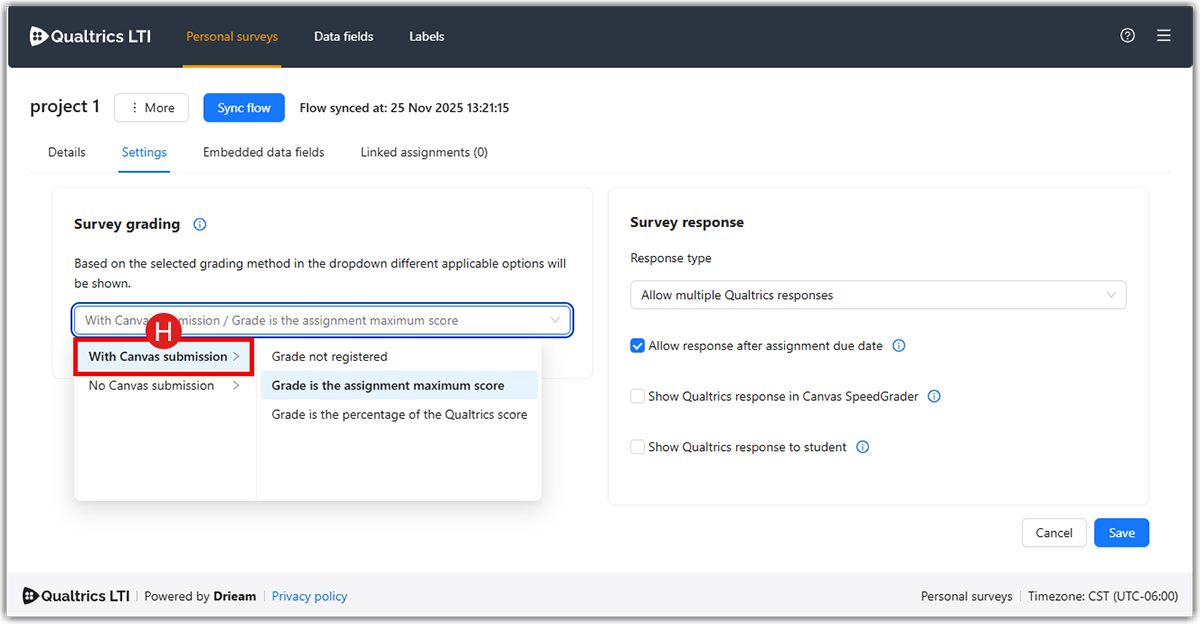
This means Qualtrics will send a grade to the Canvas Gradebook.- Grade not registered: Canvas will record the Qualtrics survey as submitted, but it will not assign any points or send a grade to the gradebook.
- Grade is the assignment maximum score: Full points are awarded when a student completes the survey. No partial points are available.
- Grade is the percentage of the Qualtrics score: Qualtrics will calculate a score based on scoring you set up inside Qualtrics questions. That percentage is applied to the assignment score in Canvas.
- No Canvas submission (I)
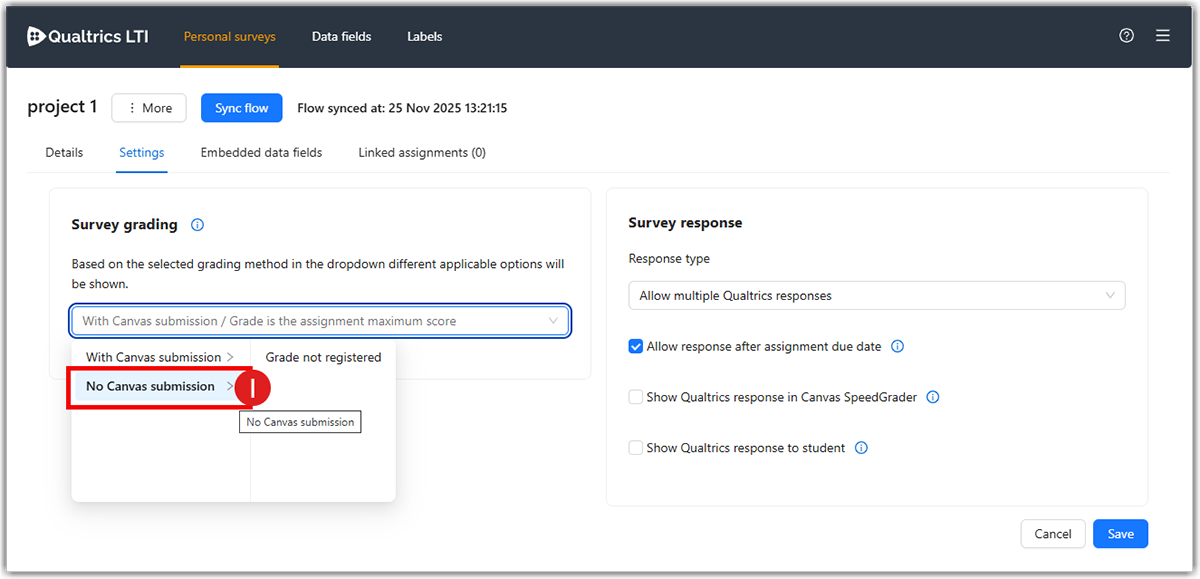
- Grade not registered: Canvas assignment stays ungraded and used for anonymous surveys. Qualtrics responses do NOT sync to Canvas gradebook.
- With Canvas submission (H).
- Survey Response Type:
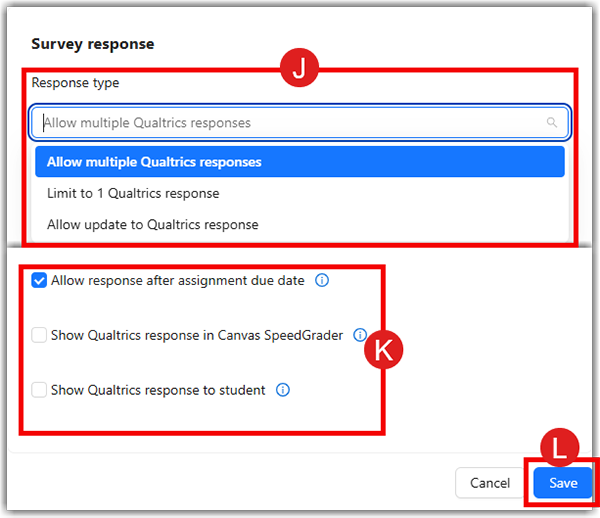
- Response Type (J)
- Allow multiple Qualtrics responses:
- Students can submit the survey more than once.
- Recommended for drafts, repeated practice surveys, or when students may need to correct mistakes.
- Limit to 1 Qualtrics response:
- Students can submit the survey only once.
- Recommended for formal surveys, course evaluations, or graded assignments.
- Allow update to Qualtrics response:
- Students can edit or update their previous submission in Qualtrics.
- Recommended if you want the students to revise their answers up to the due date.
- Allow multiple Qualtrics responses:
- Survey Response Settings (K)
- Allow response after assignment due date: If this is checked, students can still submit the Qualtrics survey even after Canvas assignment due date passes.
- Show Qualtrics response in Canvas SpeedGrader (recommended):
- If checked, the instructor can see the student's full survey answers inside SpeedGrader.
- Makes grading easier because you don’t have to open Qualtrics separately.
- Show Qualtrics response to student: Students can view a copy of their responses they submitted inside canvas.
Click Save (L) to confirm the settings.
Note: The default Qualtrics–Canvas settings give full credit automatically upon survey completion, regardless of answers given. Multiple and late responses are allowed, while survey responses are not shown in SpeedGrader or to students through Canvas. Please feel free to change the settings according to your requirements for each survey imported. - Response Type (J)
What to do in your Canvas Course
- Create a new assignment in your Canvas course.
- In the assignment setting, set the Submission type to External Tool (A) and click on Find (B).

- Left click on the Qualtrics LTI (C) from the list of external tools.

- You will see the surveys added to Qualtrics LTI in a pop-up window. Left click on the survey you would like to add as an assignment.

- Click on Next (D) on the pop-up window.

- You can decide to add notifications (learn more about notifications) to the survey. Once you click on Save (E) the survey will be added to the assignment.

- You will be redirected to Configure External Tool window, click on Select (F).

- You will be redirected to the Canvas assignment settings page. Click on Save (G) or Save/Publish (H) to save this assignment.

Why Use Canvas Data with your Survey?
Embedded data is information recorded in survey data in addition to the question responses. Using embedded data ensures clean data capture and shortens surveys. For example, instead of having a set of questions asking learners to fill in their own student number, name and date of participation, this data can be automatically pulled from Canvas.
What to do in Qualtrics LTI
- Once your survey is added, the tool will automatically redirect to the survey settings screen.

- Click on the Data Fields tab (A).

- Click on the Activate data fields button (B).

- You will see a pop-up window showing a list of data fields that can be activated. Below are the date fields available for you to use at UAB:
- Course Name
- Student Full Name
- Section Name
- Points Possible
- Student First Name
- Student Last Name
- Custom Text

- Select the checkbox(s) (C) next to the date field(s) you would like to activate, then click on Activate date fields button (D).

- Now you can see the date fields that have been activated in your survey. If you want to disable data fields, you can click on the Deactivate button (E). Please be aware that this data will no longer be captured, even if there are still assignments open. The already captured data in the submissions will still be kept in Qualtrics. Click on More (F) and then Rename (G) to rename the date field if needed.

Once the grade book is paired to Canvas, it will create an area in the grade book that allows the pairing of Gradebook items in Great River Learning to those Gradebook items sent from Canvas. This function does away with needing to go into each grading element and select the LTI line item from Canvas.
- Click on the Components tab in the top-right. This will show a list of all the components of the textbook.

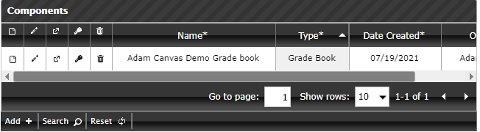
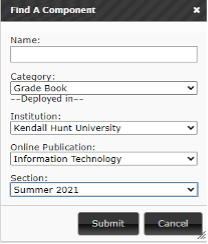
- Click Search to find your gradebook (NOTE: you may not need to do this step if you can see your Gradebook initially on the Components screen).
- Select the pencil icon to edit the grade book.

- Scroll down to the bottom of the screen. Click on the Pair Assignments button. If the button does not show up, make sure that the platform is enabled above it. If not, this may not be the correct Gradebook that was paired.
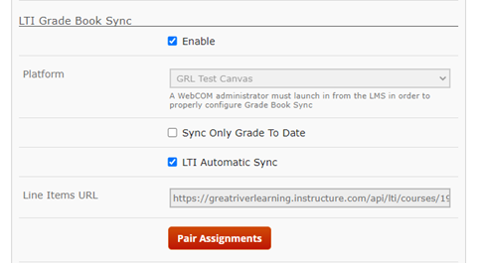
- If the grade items from Canvas were successfully created and sent, they would show up in the dropdowns on the screen. Pair up the items on the left (from the textbook) to the items on the right (from Canvas). If there are no elements on the right side, please check with the onboarding team at onboarding@greatriverlearning.com.
- Click Submit on the bottom of the page. The page will load back to the Gradebook. The Gradebook pairing is now complete.
![]() Great River Learning is a Canvas-integrated publisher that offers interactive, media-rich digital textbooks. These textbooks integrate videos, animations, and interactive exercises into the digital course materials. There is a student fee associated with using Great River Learning in your Canvas course, please contact the UAB Bookstore for more information.
Great River Learning is a Canvas-integrated publisher that offers interactive, media-rich digital textbooks. These textbooks integrate videos, animations, and interactive exercises into the digital course materials. There is a student fee associated with using Great River Learning in your Canvas course, please contact the UAB Bookstore for more information.
How to Access Great River Learning
Instructors
Important Notes:
- If you would like a member of the Great River Learning team to walk you through the following process, please email onboarding@greatriverlearning.com.
- Students need to be added to the Canvas section that corresponds with their Great River Learning section.
- Currently, only assignment types in Canvas can pass grades back to Great River Learning. Quizzes, discussions, etc. do not have the option to add the external tool submission type mentioned below. This means that all items will need to be created as an assignment to pass those grades from Canvas to Great River Learning.
- If there are any questions on which assignments/quizzes/tests are in Great River Learning, please contact the account manager or the onboarding team at onboarding@greatriverlearning.com.
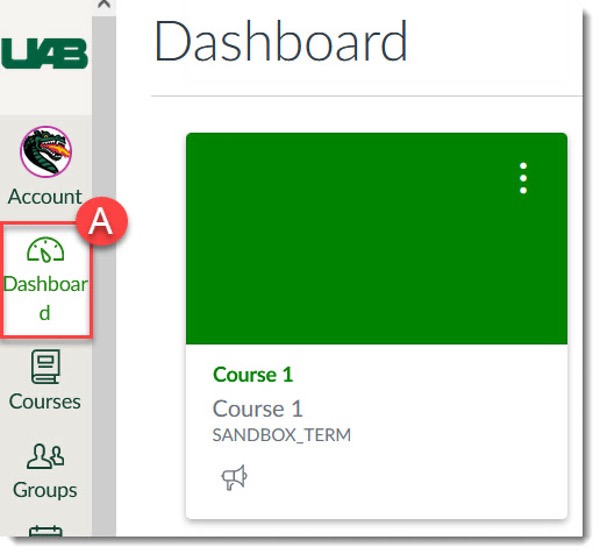
- In Canvas select Dashboard (A) and navigate to the course you want to integrate.
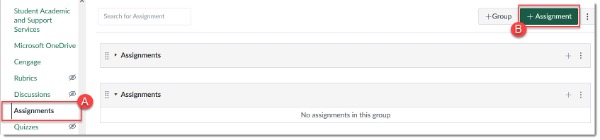
- Navigate to Assignments (A). Click on + Assignment (B) in the top right to add a new assignment (or edit a current assignment to add the LTI link). You can also add assignments through the Modules page.
- Create an assignment:
- Give the item a name.
- Assign the points that the item is worth.
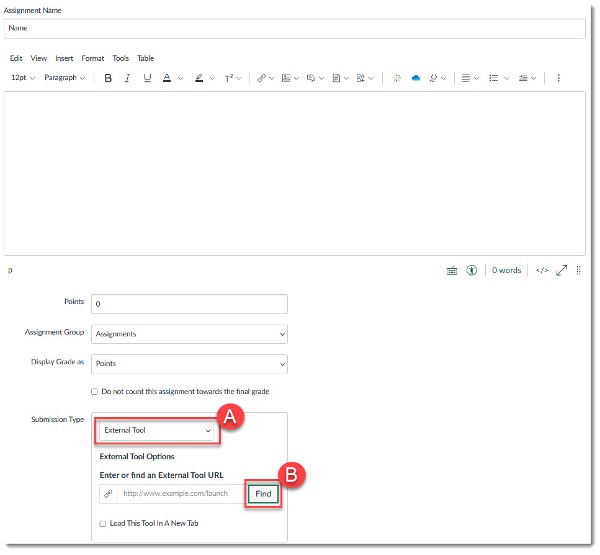
- Change Submission Type to External Tool (A).
- Click on Find (B)and scroll down on the list to find Great River Learning, then click Select.
- Alternatively, after verifying the tool is found with the step above, paste this URL into the box next to Find: https://www.grlcontent.com/wc3LtiRedirect.
- Select the Load This Tool in a New Tab checkmark.
- Click Save and Publish.
- Repeat step three above until all the assignments that are to be synced are added in Canvas.
- IMPORTANT! Required Setup Step:
- Launch to Great River Learning from any Canvas assignment by clicking on the assignment link. You will then be presented with the following screen, select which Great River Learning grade book to associate with the Canvas grade book by clicking on the plus sign to the left of the grade book you are working on.
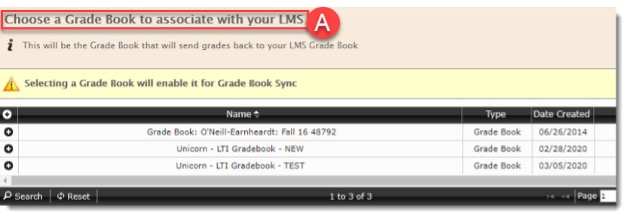
- This step links the grade book so it is important that this step be completed. If you DO NOT see the message “Choose a Grade Book to associate with your LMS” (A) it means the course has already been linked to a different grade book and the Great River Learning IT developer will need to resolve the issue.
- Great River Learning’s IT developer will need the CANVAS course ID to determine the name of the grade book the course is tied to. The course ID can be found at the end of the URL from the home page of the Canvas course. For example, the courseID is 1020754 for this Canvas course: ivytech.instructure.com/courses/1020754
- Launch to Great River Learning from any Canvas assignment by clicking on the assignment link. You will then be presented with the following screen, select which Great River Learning grade book to associate with the Canvas grade book by clicking on the plus sign to the left of the grade book you are working on.
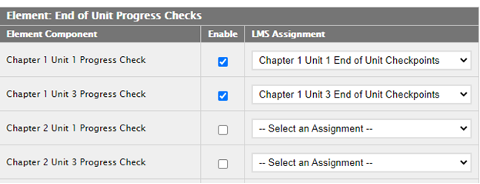
- After the grade book is paired, the individual elements need to be connected between Canvas and Great River Learning. This next section can be done individually by the instructor, or by the Great River Learning onboarding team. For more information, please review the Pairing Gradebook Elements guide. Additionally, you may email the onboarding team at onboarding@greatriverlearning.com for assistance.
Students
If an instructor is using Great River Learning resources in a course, students simply need to click on any Great River Learning Activity in the course, such as an assignment or quiz for access.
Guides/Tutorials
Technical Support
Please follow the steps below if you need technical support after reviewing the information, guides, and FAQs above.
-
Contact Great River Learning Support
Great River Learning is available for instructors and students Monday-Friday, 8:00 a.m. – 5:00 p.m. (Central Standard Time).
-
Ask Learning Technologies
If these support options do not give a satisfactory resolution, please submit a Learning Technologies Support request and include any ticket numbers provided by Great River Learning.
Privacy & Accessibility
Badges can be awarded for a variety of purposes, including:
- interest and engagement
- participation or attendance
- knowledge or dispositions
- certificates
- proficiency, competency, or skill
Access as a Participant
Within a Canvas Course
View the Student Flowchart for an overview of the digital badging process.
If your course is using digital badges (Parchment Badges) these will be accessed in the Canvas course by clicking on “Parchment Badges” on the course navigation menu.
From the Parchment Badges menu in Canvas, students may see up to two tabs:
- Progress: To view the digital badges earned in the course, along with the digital badges that have not yet been earned. Students can click on a digital badge they've earned to download and/or share on social media.
- Leaderboard (optional): Students can view digital badge progress for all the students enrolled in the course (please note the leaderboard must be enabled in the course).
Outside of Canvas
Go to Parchment Digital Badges and enter your BlazerID and password to log in to Parchment Digital Badges.
Once in Parchment Digital Badges, you can:
- Click on “My Record” to view your history and achievements
- Click on “My Badges” to view your earned digital badges. On the “Other” tab, you can view digital badges earned through other organizations
- Click on “My Pathways” tab to view progress toward earning digital certificates and other pathway opportunities (if applicable)
- Click on “Resources” to view available resources for digital badges
Use Badges in Your Course
Instructors
View the Faculty Flowchart for an overview of the digital badging process.
To get started with issuing digital badges into your Canvas course, you must first request to utilize badging and receive approval. To do so, follow the steps below:
- Fill out the Canvas Digital Badge Request Form. A member of the Learning Technologies team will be in touch regarding next steps.
Canvas Digital Badge Request Form - Start working on the digital badge information sheet (downloadable worksheet template). This will provide the Learning Technologies team with the information needed to setup the badge.
- A member of the Learning Technologies team will schedule a meeting with you to discuss the badge proposal.
Once approval has been granted and Learning Technologies has installed Parchment Digital Badges in your course, follow the steps below to enable Parchment Digital Badges in your Canvas course:
- On the course navigation menu in Canvas, select Parchment Badges.
- Click “Accept” for the Terms of Service and Privacy Policy to authorize Parchment Badges.
- Once you have authorized Parchment Badges, you will be asked to reload the page.
- Now you will be able to assign badges to desired modules. The badges will be awarded when module completion requirements are met.
Guides
Instructors
FAQ
-
How are digital badges awarded in a course?
Digitals badges (Credentials) are awarded upon completion of instructor set requirements. More information on how to set Canvas module completion requirements can be found on the Setting Module completion requirements guide.
-
Can I share a digital badge I’ve earned?
Yes, badges can be shared from within Canvas and on the Credentials website. For information on sharing badges, visit the Sharing Badges within Canvas guide and the Sharing Badges on the Canvas Credentials website guide.
-
What should I do as an instructor if digital badges are not automatically awarded?
If students have completed the requirement(s), but have not yet received their digital badge(s), the instructor may need to trigger a badge check. For more information on triggering digital badges, visit the Triggering badge awards in Canvas courses guide.
-
What are Canvas Credentials Pathways?
Canvas Credentials Pathways connect badges from any platform into meaningful pathways users can follow. Users can track their own progress and look ahead to plan the next steps in their learning journey. To view a sample of a pathway, visit the Pathway sample webpage. If you are interested in creating a pathway, contact eLearning.
Instructor Training
To request digital badges (Parchment Badges) training, Learning Technologies.
Technical Support
Please follow the steps below if you need technical support after reviewing the information, guides, and FAQs above.
-
Contact Canvas Support
- Email Parchment Digital Badges Support Support for Parchment Digital Badges is available for instructors and students Monday–Friday 9:00 a.m.–5:00 p.m. Pacific Time (11:00 a.m.–7:00 p.m. Central Time).
-
Ask Learning Technologies
If these support options do not give a satisfactory resolution, please submit a Learning Technologies Support request and include any ticket numbers provided by Parchment Digital Badges.
Privacy and Accessibility